Cost Estimator
See what verified chimney sweeps charge in your area for each service.

Chimney flashing is the waterproof seal where your chimney meets your roof — sheet metal woven between the shingles and the chimney masonry. When it fails, water enters the attic and ceiling at the chimney penetration, produces visible stains on interior drywall, and triggers what is often the most expensive misdiagnosis in the industry: a $300 flashing leak quoted as a $3,000 chimney repair. This happens routinely. Homeowners call a chimney sweep for a water problem at the chimney; the sweep quotes crown repair, liner replacement, or waterproofing; the actual fix was 60 feet away at the roof line.
This guide is the consumer reference for chimney flashing. It covers what flashing is, why it fails, the three flashing types (step, counter, cricket), the real cost ranges for repair vs replacement, the misdiagnosis problem, and who to hire — chimney sweep, roofer, or mason. If you have water staining near the chimney, read this before agreeing to any major chimney repair quote.
Chimney flashing is the metal barrier that makes the transition between the chimney and the roof watertight. Every masonry chimney that passes through a roof has flashing. It is always there, always hidden under shingles or tucked into mortar joints, and always load-bearing for the entire roof-penetration seal.
A typical chimney flashing system is three distinct components working together.
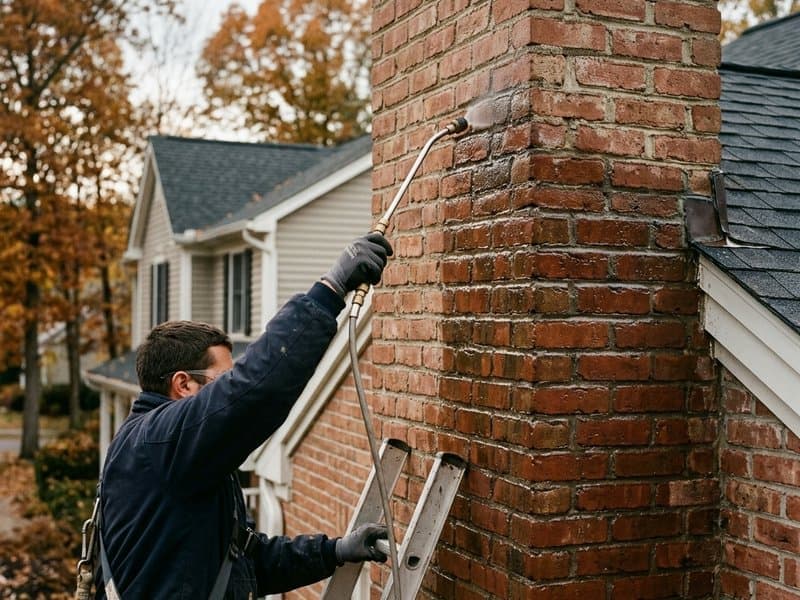
Step flashing is L-shaped metal pieces — typically 5-10 inches square — installed one per shingle course along the sides of the chimney. Each piece is layered so that water running down the roof flows over the flashing below it, never behind it.
Counter flashing is a second layer embedded into the mortar joints of the chimney itself. It overlaps the top of the step flashing, providing a second watertight seal against the chimney wall. The combination — step + counter — is the standard flashing approach for all modern masonry chimneys.
Cricket or saddle flashing is an additional wedge-shaped structure installed on the uphill side of wide chimneys (typically chimneys over 30 inches wide). The cricket diverts water around the chimney instead of letting it pool against the uphill wall. Chimneys without crickets in this size range develop chronic uphill-side leaks.
When any one of these three fails, water enters. When flashing is installed incorrectly from the start — typically by a roofer who is not familiar with masonry-flashing integration — the entire system can leak from day one.
Flashing fails from predictable causes. Understanding which cause applies to your chimney affects whether you need repair or full replacement.
Masonry and sheet metal expand at different rates. Every heating season cycle — chimney heats during use, cools between uses — slightly flexes the flashing seal. Over 15-25 years of cycling, caulks fail, metal fatigues, and seams separate. Thermal cycling is the single most common flashing failure mode and the reason even properly-installed flashing has a finite life.
Galvanized steel flashing loses its zinc coating in 20-30 years, after which it rusts through. Aluminum flashing develops pinhole corrosion in coastal environments. Lead flashing — used on historic homes and high-end installs — has effectively unlimited life but is rarely used in modern construction. The original flashing on most 1980s-1990s homes is reaching end-of-life now.
The most common installation error is missing or inadequate counter flashing. Builders who are trying to save time sometimes install step flashing and seal the top edge with caulk instead of embedding counter flashing into mortar joints. The caulk lasts 3-7 years before it fails, at which point water runs down the step flashing and behind the chimney wall.
A second common error is flashing installed over the shingles rather than woven into them. Water running down the roof then pools on top of the flashing instead of flowing over it.
This is the most expensive failure mode because it appears weeks or months after the roof work and gets misattributed. Roofers replacing a roof often reuse the old flashing or install new flashing poorly on the chimney side. Water entry begins in the next heavy rain, months after the roofer has been paid and has moved on. The homeowner blames the chimney when the problem is the re-roof.
If your chimney started leaking within 6-18 months of a roof replacement, the flashing install during the re-roof is the first place to look. The original roofer is the first person to call — re-flashing is often covered under their workmanship warranty.
Five observable signs that point to flashing rather than chimney interior problems. If you see any of these, get a flashing inspection before accepting a chimney repair quote.
Compare these to interior chimney failure signs (water in the firebox after rain, efflorescence on the chimney below the crown, smoke smell from an idle flue). Ceiling stains at the chimney = flashing. Firebox water = often crown or cap. Both can happen together, but the distinction matters for getting the right repair.
The flashing misdiagnosis is one of the costliest consumer mistakes in the chimney industry. Here is how it happens.
A homeowner sees a water stain on the ceiling near the chimney. They call a chimney sweep (correctly — the chimney is the obvious suspect). The sweep arrives, inspects the chimney, and finds what is always present on a chimney: minor crown cracks, some cap wear, possibly visible tuckpointing wear on the exterior masonry. The sweep quotes $3,000-$5,000 for crown rebuild, cap replacement, and waterproofing.
The homeowner pays for the chimney work. The stain continues to grow. A roofer eventually looks at the roof side and finds step flashing that was never embedded into counter flashing — a $300-$800 repair. The entire chimney spend was unnecessary. The flashing was always the issue; the crown and cap issues the sweep identified were real but unrelated to the leak.
Chimney sweeps inspect chimneys. They are less likely to climb onto the roof and inspect the flashing integration in detail. They find chimney issues that exist — and on older chimneys, some issues always exist — and quote them as the solution to the visible problem. The quote is technically for real work; it just does not address the actual cause.
Roofers have the opposite blind spot. They inspect the roof. They often find shingle issues or flashing issues that are real but unrelated to a chimney-side problem, and quote those as the solution. The result is that homeowners sometimes get quotes from both trades and neither addresses the correct issue.
For any water intrusion visible near a chimney, the correct first step is to identify where the water is entering. Interior staining on the ceiling directly adjacent to the chimney points to flashing. Water in the firebox itself points to the chimney top (crown, cap). Water on interior wall surfaces near the chimney, away from the ceiling, can be either — deeper investigation is required.
Request both a chimney-side and a roof-side inspection if the entry point is not clear. A combined $100-$200 in diagnostic visits prevents a $3,000-$5,000 misdiagnosed repair.
Flashing repair is one of the cheaper chimney-adjacent repairs when scoped correctly. Quotes that significantly exceed these ranges warrant a second opinion.
| Scope | Typical Cost Range | When This Applies |
|---|---|---|
| Reseal existing flashing (caulk and sealant refresh) | $150-$400 | Flashing in good physical condition, sealant failure only |
| Partial reflashing (replace step or counter, not both) | $400-$800 | One component failed; the other is serviceable |
| Full reflashing (step + counter replaced) | $800-$1,500 | End-of-life flashing, material degradation throughout |
| Full reflashing + cricket installation | $1,300-$2,500 | Wide chimney (>30 inches) on sloped roof without existing cricket |
| Emergency tarp and reseal | $200-$400 | Temporary fix during severe weather |
Quotes above $2,500 for flashing-only work on a standard-width single-story chimney should be scrutinised. Scope complications that legitimately raise cost include: historic or custom materials (copper flashing), extreme roof pitch (above 10/12), high chimney (three-story), or integrated repair that includes chimney masonry work alongside the flashing.
| Signal | Reseal (Repair) | Partial Replace | Full Replace |
|---|---|---|---|
| Flashing age | Under 15 years | 15-25 years | Over 25 years |
| Physical condition | Intact, no lift or rust | Localised damage | Widespread rust or lift |
| Recent roof replacement | Yes (under 2 years) | Sometimes | Often, if roofer reused flashing |
| Failure mode | Caulk or sealant only | Single component failed | Systemic material degradation |
| Expected service life post-repair | 3-7 years | 10-15 years | 20-30 years |
| Typical cost | $150-$400 | $400-$800 | $800-$1,500 |
Reseal buys time. Full replacement resolves the underlying issue. If the reseal quote is within $200-$300 of the full replacement quote, full replacement is usually the better choice — it provides dramatically longer service life for modest additional cost.
Flashing work sits at the intersection of three trades. Each brings different strengths and different blind spots.
Chimney sweeps work primarily on the chimney side of the flashing system — the counter flashing, the mortar joints, the chimney masonry. Many sweeps include flashing reseal and counter flashing repair in their service offerings. They are the right choice when the work is clearly on the chimney side and does not involve significant roof integration.
Strengths: Understand masonry-side waterproofing, available for combined crown/cap/flashing inspection in one visit, typically include flashing in overall chimney waterproofing packages.
Weaknesses: Less practiced at step flashing installation and shingle integration, sometimes misdiagnose roofing issues as chimney issues.
Roofers work primarily on the roof side — step flashing, shingle integration, the overall watertight roof envelope. Most roof-side flashing issues are best addressed by a roofer, particularly when the issue relates to a recent roof replacement.
Strengths: Expert at shingle integration, typically the right call for step flashing replacement, usually the warranty holder on a recent roof.
Weaknesses: Sometimes less familiar with masonry-side counter flashing, may undersell the counter flashing and mortar work component.
Masons are the right choice when the flashing failure is accompanied by significant masonry damage — deteriorated mortar joints where counter flashing embeds, cracked or spalled brick at the roof line, or mortar that has failed at the chimney-roof intersection. A mason can address both the masonry substrate and the counter flashing that embeds into it.
Strengths: Expert at mortar joint repair, correct trade for historic masonry chimneys.
Weaknesses: May not carry flashing materials or roofing expertise, typically more expensive than a chimney sweep or roofer for simple scope.
For most residential flashing issues: get a quote from both a chimney sweep and a roofer. If their diagnoses agree, hire the cheaper quote. If they disagree, the disagreement itself is information — ask each to explain why the other is wrong. A mason becomes relevant when masonry damage is documented as part of the scope.
If your issue involves a recent roof replacement, start with the original roofer — their workmanship warranty likely covers the issue at no additional cost.
Four flashing materials cover nearly all residential installations. Each has a different cost, lifespan, and application fit.
| Material | Cost relative | Lifespan | Best for |
|---|---|---|---|
| Galvanized steel | Cheapest | 20-30 years | Budget installs, standard construction |
| Aluminum | Medium | 20-40 years (climate dependent) | Most residential, corrosion-prone climates |
| Lead | Premium | 50+ years | Historic homes, high-end installs |
| Copper | Premium | Lifetime (patinas green) | Historic, high-end, aesthetic installs |
For most homes, aluminum flashing is the right modern choice — good lifespan, reasonable cost, resistant to most corrosion. Galvanized steel is adequate but rusts through eventually. Lead and copper are premium choices for specific situations. The material choice typically adds $200-$600 to a full reflashing job between the cheapest and most expensive options — a meaningful difference but not the dominant cost factor.
Unlike chimney cap installation, which is realistic DIY on the right chimney, flashing is not a DIY job. Three reasons.
Integration with shingles. Step flashing must be woven into the shingle pattern one course at a time. Getting this wrong creates leaks that are invisible from above but active from the first rain. Retrofit flashing installation on existing shingles without complete reweaving is nearly always a failure.
Counter flashing mortar embedment. The counter flashing component embeds into mortar joints on the chimney. Cutting, embedding, and sealing this requires masonry tools and mortar matching. A homeowner attempt usually produces either a sealed-but-not-embedded approximation (which fails in 2-5 years) or actual damage to the chimney mortar.
Roof fall risk. Flashing work takes place at the roof line with the operator pressed against the chimney — awkward body position, minimal work area, typically on a sloped surface. Professional installers use roof anchors and fall-arrest gear. Homeowners usually do not.
For flashing work, the professional install is not a luxury — it is the only path to a watertight system. Budget the $400-$1,500 for a proper install. The DIY savings are illusory because the DIY install typically fails within 2-5 years and requires re-work.
Browse 30+ guides, or jump straight to verified operators in your state.
Chimney waterproofing cost, when it's worth it, the vapor-permeable vs sealer distinction, and why Thompson's Water Seal damages brick chimneys.
Chimney crown repair cost $150-$2,000. Crown vs cap vs chase cover, severity-based repair options, and the $2,000 rebuild upsell for $200 hairline cracks.

Chimney cap types, costs $150-$1,200, stainless vs galvanized warranty truths, three-measurement sizing, OSHA 4/12 access rules, and the cap install upsells to avoid. Expert-reviewed.