Cost Estimator
See what verified chimney sweeps charge in your area for each service.
Tuckpointing chimney work is the single most common masonry repair a homeowner will ever pay for — and the single most commonly botched. The job itself is straightforward: remove deteriorated mortar from the joints between bricks, pack fresh mortar in, tool it to match the existing profile, and let it cure. Done correctly, tuckpointing buys another 25 to 30 years of chimney life for a few thousand dollars. Done incorrectly — with the wrong mortar mix on a pre-1920s chimney — it can actively destroy the brick it was meant to protect.
This guide is the deep-dive on one specific repair. Our broader article on chimney masonry repair covers spalling, crown cracking, step cracks, and structural rebuilding at a high level. Here, we go deep on tuckpointing because it's the repair most homeowners face, the one contractors most often upsell or mis-execute, and the one where choosing the wrong operator can turn a $2,000 fix into a $15,000 structural rebuild five years later.
Tuckpointing is the process of removing deteriorated mortar from the joints between bricks to a depth of roughly three-quarters of an inch, cleaning and wetting the exposed joint surfaces, and packing fresh mortar in to restore the weather-tight seal. The new mortar is then tooled — pressed and shaped — to match the profile of the original joints (concave, V-joint, flush, or raked).
The terminology is muddled, and it's worth clearing up. Pointing is the filling of mortar joints during the original construction of a brick structure. Repointing is the removal of old failing mortar and replacement with new mortar — the generic industry term for what most people mean when they say "tuckpointing." Tuckpointing is technically a specific decorative technique using two contrasting mortar colours to create the visual illusion of very fine joints, popular in 18th- and 19th-century British masonry.
In modern American chimney work, though, nearly every contractor uses "tuckpointing" and "repointing" interchangeably. If you ask three contractors for a "tuckpointing quote," all three will quote what an architectural historian would call repointing. Don't fight the terminology — focus on the quality of the work itself, which is what actually matters. When you read quotes, assume "tuckpointing" means "fixing the mortar joints" unless the contractor clarifies otherwise.
Chimneys are the most exposed masonry on your house. Every other brick wall has overhangs, soffits, or adjacent structure that partially shelters it from rain, sun, and freeze-thaw. The chimney stands alone, fully exposed on all four sides, from the roofline to the cap. Weather attacks it from every direction, and mortar is the first thing to give.
Three forces do most of the damage. Freeze-thaw cycling is the worst of them: water penetrates tiny hairline cracks in the mortar during rain or snow melt, then freezes overnight. Ice occupies roughly 9% more volume than water, and that expansion pries microscopic cracks open wider. The next freeze does it again. Over a decade, mortar that started as a continuous weather seal turns into crumbling sand.
Age is the second force. Even Portland cement mortar in perfect conditions has a realistic lifespan of 25 to 30 years before the binders start to fatigue and the joint loses cohesion. Lime mortar lasts longer — a well-built 1890s chimney with original lime mortar might still have 60% of its original joints intact — but once a joint starts to fail, it fails quickly once water gets in.
Original mix quality is the third, and this one is often invisible until it's too late. A mason who was short on cement on the day the chimney was built, or who used the wrong sand, or who mixed in cold weather, or who troweled too wet — any of those produces joints that fail prematurely. There's no way to know from the ground level thirty years later.
The signs are visible to anyone with binoculars and a ladder. You do not need a contractor to diagnose this — diagnosing it yourself first is the best defence against a contractor who wants to upsell you on a full rebuild you don't need.
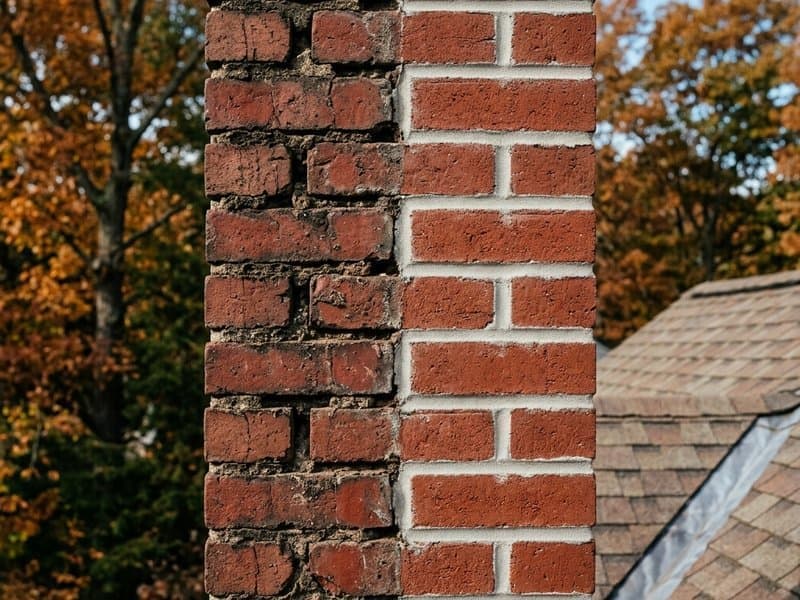
Mortar recessed more than a quarter inch from the brick face is the clearest signal. Healthy mortar joints sit nearly flush with the brick or slightly recessed in a deliberate profile. When you can see a visible channel between bricks where mortar should be, the joint is failing.
Mortar crumbling under pressure is the next test. Take a flat-head screwdriver and gently press the tip into a suspect joint. Sound mortar is hard and gritty — the screwdriver shouldn't penetrate. Failed mortar is soft and sandy — the tip sinks in easily and mortar flakes out. If you can dig out a quarter-inch of mortar with a screwdriver without real force, that joint needs repointing.
White staining on brick faces, called efflorescence, indicates water has been moving through the masonry, dissolving soluble salts, and depositing them on the surface as it evaporates. It's proof of water penetration, which almost always means compromised mortar joints.
Water in the firebox during rain can have several causes — failed flashing, a cracked crown, a missing cap — but a surprisingly large percentage of "leaking chimney" calls trace back to failed mortar joints letting rain through the stack itself, not the crown or flashing at all.
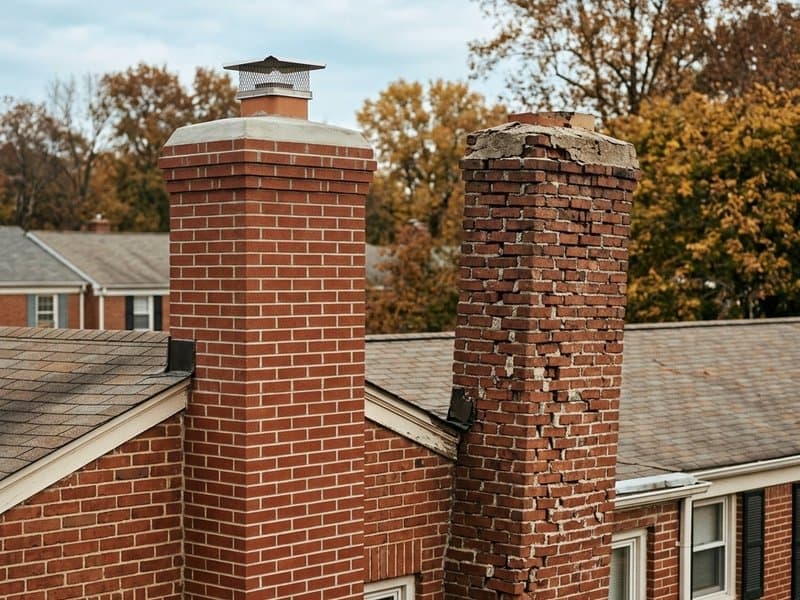
Loose or shifted bricks are the point where tuckpointing is no longer enough — if bricks are moving, the structural integrity of the stack is compromised and you may need partial rebuilding rather than just repointing. Get a second opinion before agreeing to a full rebuild though; some contractors declare any loose brick a rebuild when selective tuckpointing plus a few individual brick replacements would solve the problem.
This single issue is the difference between a tuckpointing job that lasts 30 years and one that destroys your chimney in five. It's also the technical detail almost no homeowner knows to ask about — which is why so many pre-1920s chimneys are ruined by well-meaning contractors using modern materials.
Pre-1920s masonry used lime mortar. Before Portland cement dominated American construction in the 1920s, masons used lime mortar — a mix of hydrated lime, sand, and water. Lime mortar is comparatively soft, flexible, and breathable. When the chimney moves slightly with temperature, settlement, or wind load, lime mortar flexes with it. When moisture enters the brick, lime mortar allows it to escape back out through the joints rather than trapping it inside the masonry unit.
Modern masonry uses Portland cement mortar. Portland is hard, rigid, and less permeable. It's the correct material for chimneys built after roughly 1930. On a modern chimney, Portland repointing matches Portland original mortar and the system performs well.
Using Portland cement to repoint a lime-mortar chimney destroys the brick. This is not a stylistic preference — it's a physical consequence. Portland is harder than the soft, hand-made bricks used on pre-1920s chimneys. When the chimney tries to flex or when moisture tries to escape, the Portland joint refuses to yield. Instead, the brick does. The brick face cracks, spalls, and disintegrates, while the Portland joint sits there looking perfect. Within five to ten years, a chimney that was structurally sound before repointing is missing the outer face of every brick around every joint.
How to tell what you have. Scrape some of your existing mortar out with a screwdriver and look at it. Lime mortar is soft, sandy-textured, often a warm off-white or cream colour, and crumbles easily between your fingers. Portland mortar is hard, dense, grey, and resists being scraped at all. If your chimney was built before 1930 and the original mortar is still in place, it's almost certainly lime.
The question to ask every contractor. "What mortar type and mix will you use on this chimney, and why?" A contractor who knows the building era of your home and answers with specifics — "this is a 1905 home, so we'll match with a Type O lime-based mortar at roughly a 1:2:9 ratio" — is a contractor you can trust. A contractor who says "we use standard mortar, it'll be fine" on a pre-1920 chimney is the contractor who will destroy your brickwork. Find someone else.
| Factor | Lime Mortar (Type O / Type K) | Portland Cement Mortar (Type N / Type S) |
|---|---|---|
| Appropriate for | Pre-1920s chimneys, soft handmade brick, historic buildings | Post-1930s chimneys, modern hard-fired brick |
| Compressive strength | 350-750 psi | 750-2,500 psi |
| Flexibility | High — absorbs thermal and structural movement | Low — transfers stress to the brick |
| Breathability | High — moisture escapes through joints | Low — moisture trapped in masonry |
| Lifespan on matching substrate | 50+ years | 25-30 years |
| Cost premium | 15-30% more than Portland | Baseline |
| Common mistake | Being rejected by contractors who only know Portland | Being used on historic brick, destroying it |
Tuckpointing pricing varies enormously by chimney height, access difficulty, local labour rates, and the extent of repointing needed. These ranges reflect the national 2026 baseline — adjust upward 20-30% for Northeast metros, coastal California, and the Pacific Northwest.
Full chimney tuckpointing (all joints from roofline to cap, both accessible sides, scaffold setup): $1,000 to $3,000 for a standard two-story home with a straightforward chimney. Add $500 to $1,500 for tall chimneys requiring extensive scaffolding, homes with steep or complex roof access, or chimneys on three-story structures.
Partial tuckpointing (only joints showing clear deterioration, typically 20-40% of total joint footage): $300 to $800. This is the right approach for chimneys where most of the mortar is still sound — paying to repoint joints that don't need it is wasted money.
Per-linear-foot pricing is how many contractors quote: $5 to $15 per linear foot of joint repointed. A typical residential chimney has 150-300 linear feet of joints in the above-roof section, which is why full-chimney prices land where they do.
Emergency or winter pricing runs 25-50% higher because mortar cure requires temperatures above 40°F. Winter work uses accelerants and cold-weather protection, neither of which produces a repair as durable as warm-weather work. Wait until spring if the damage isn't allowing active water infiltration.
What changes the price. Chimney height above the roofline (taller means longer ladder or scaffolding), access difficulty (cherry picker rental runs $400-$700/day on top of labour), extent of damage, mortar type (lime premium), and whether the contractor includes post-repointing waterproofing with a breathable sealer.
A professional tuckpointing job follows a predictable sequence. Knowing the steps lets you verify the work is being done correctly.
Step 1: Mortar removal. The contractor removes deteriorated mortar to a depth of roughly three-quarters of an inch. On older soft brick, this should be done with a hand chisel to avoid damaging the brick faces. On modern hard brick, a narrow angle grinder with a tuckpointing blade is faster and acceptable. Watch for contractors using a wide grinder that cuts into the brick itself — that's permanent damage that can't be repaired.
Step 2: Joint cleaning and wetting. After removal, the joints are brushed clean of loose debris and wetted with a spray bottle. The wetting is not optional. Dry joint surfaces absorb water from the new mortar too quickly, causing the mortar to cure before it bonds, which produces shrinkage cracks within the first year.
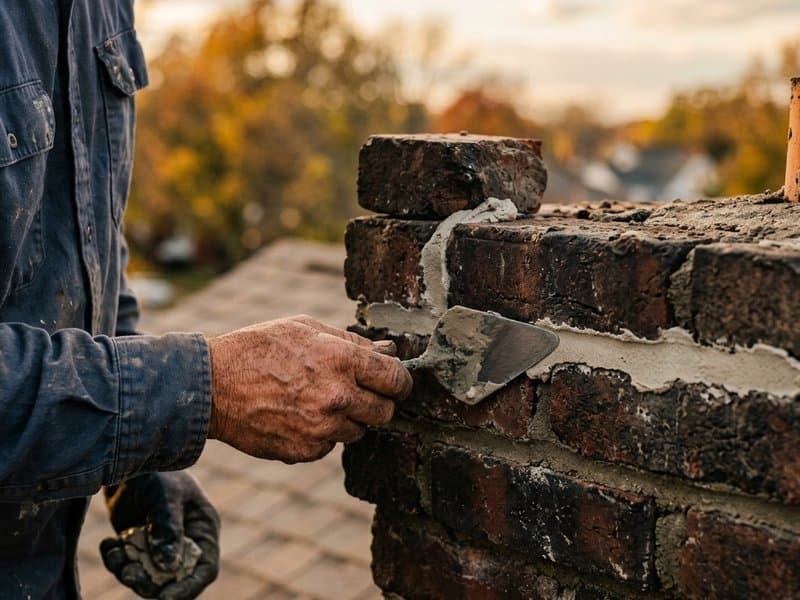
Step 3: Mortar packing in layers. The contractor packs fresh mortar into the joint using a pointing trowel or grout bag. For deep joints, this is done in layers — half-inch at a time, with each layer allowed to stiffen before the next. Packing all three-quarters of an inch in one pass causes shrinkage cracks as the mortar cures unevenly. A contractor doing a single-pass fill on deep joints is cutting corners.
Step 4: Joint tooling. While the mortar is still pliable but beginning to set, the contractor tools the joint to match the existing profile. Most older chimneys have concave joints (recessed inward in a curve) or V-joints (recessed in a sharp V). The tooled profile affects water-shedding — poorly tooled joints collect water instead of channeling it away.
Step 5: Curing. Fresh mortar needs 24 to 72 hours of moist curing to reach its full strength. In hot, dry, or windy weather, the contractor should spray-wet the joints periodically or hang a damp tarp over the work. Mortar that cures too fast develops microcracks and fails prematurely. A contractor who walks away the moment the last joint is tooled without any curing provision is leaving you with weaker work than you paid for.
Tuckpointing is one of the few chimney repairs a reasonably competent homeowner can do — but only on the ground-level or rooftop-accessible portions of the chimney, and only if the homeowner is comfortable with ladder and roof work. Above the roofline on a two-story house, hire a professional. The risk-adjusted return on DIY tuckpointing at height is terrible — a fall from 25 feet produces injuries that cost many multiples of what the full repointing job would have cost.
What you need: a mortar raking tool or small angle grinder with a tuckpointing blade, a pointing trowel, a grout bag (for tight joints), the correct mortar mix for your chimney era, a spray bottle, and safety gear (eye protection, dust mask, gloves).
The mortar is the thing most DIYers get wrong. Buy pre-mixed Type N mortar for post-1930 chimneys; mix your own lime-based Type O or Type K for older chimneys following a published historic-masonry recipe. Don't guess. Don't use generic mortar from the orange or blue hardware stores for a lime-mortar chimney — they don't stock Type O or K in most locations.
Expect a full DIY repointing of a ground-accessible section to take 6-10 hours across two days (one for removal and prep, one for packing and tooling). Budget for mistakes — your first joint will not look like your tenth.
Properly matched mortar on a properly prepared joint, tooled and cured correctly: 25 to 30 years, sometimes more. This is the baseline a good contractor should be able to quote you.
Mismatched mortar on a historic chimney: 5 to 10 years before brick spalling becomes visible, followed by accelerating damage as the brick face fails and exposes the interior units to weather.
Single-pass deep packing on deteriorated joints: 3 to 7 years before shrinkage cracks develop and water infiltration restarts the deterioration cycle.
Winter emergency repointing with accelerants: 7 to 15 years — less than warm-weather work but acceptable if genuine emergency conditions required immediate repair.
Plan tuckpointing for late spring through early fall, when ambient temperatures are reliably above 40°F for the full 72-hour cure window. The ideal window is late April through early October in most US climates — earlier in the Sun Belt, later in New England and the Mountain West.
Avoid scheduling in the week before expected rain. Fresh mortar exposed to heavy rain in the first 24 hours can wash out of the joints before it's set. A contractor should reschedule if rain is in the forecast during the cure window; one who works through it regardless is prioritising their schedule over your repair's durability.
If a contractor tells you tuckpointing won't solve your problem, evaluate that claim carefully — but don't dismiss it. Some chimneys genuinely need more than repointing.
The honest "more than tuckpointing" scenarios: bricks have shifted or separated from their original position (not just surface spalling), the chimney has visibly tilted or leaned from plumb, the crown has failed and is dropping water into the wall cavity of the stack, or the firebox/smoke chamber has cracks that wouldn't be reached by exterior repointing. In these cases, rebuild or partial reconstruction may be correct.
The dishonest "more than tuckpointing" scenarios: a contractor declares the chimney needs full rebuilding when only a few rows of brick near the top show deterioration, a contractor declares structural failure based only on surface staining or efflorescence, or the word "rebuild" appears in a quote over $8,000 without camera footage or specific documented structural issues. These are the patterns covered in our quote-variation resource — always get a second opinion before committing to rebuild-scale work.
Browse 29+ guides, or jump straight to verified operators in your state.
Masonry chimney repair scope, cost, and process — tuckpointing, spalling, cracks, efflorescence. When to hire a mason vs a chimney sweep.
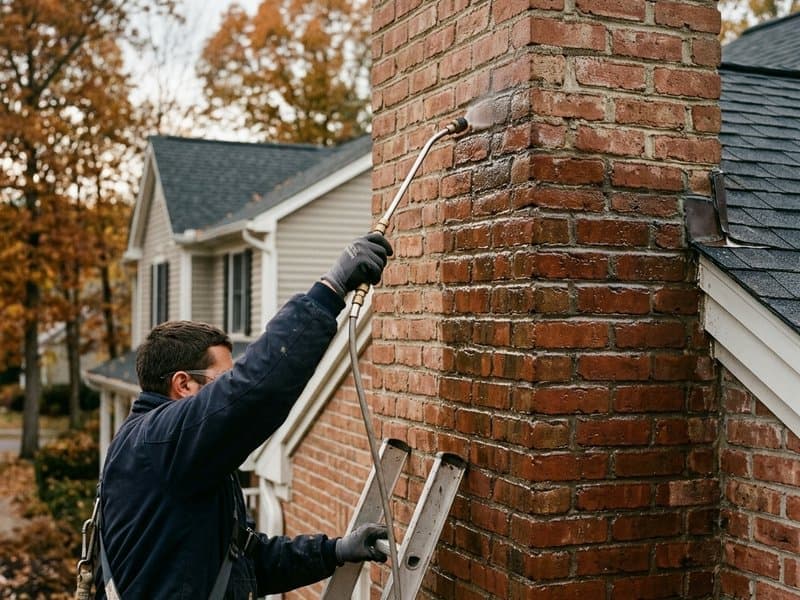
Chimney waterproofing cost, when it's worth it, the vapor-permeable vs sealer distinction, and why Thompson's Water Seal damages brick chimneys.
Chimney rebuild cost $3,000-$25,000 — but most rebuild quotes are inflated. When you actually need a rebuild vs repair, with scope, cost, and red flags.